glittersweet: (Default)

Okay so I am much better able to plan but I still have fatigue and my RA which means I cannot do everything I want. So in the lead up to the Sickening Ball and Armageddon I need a few twofer wins.


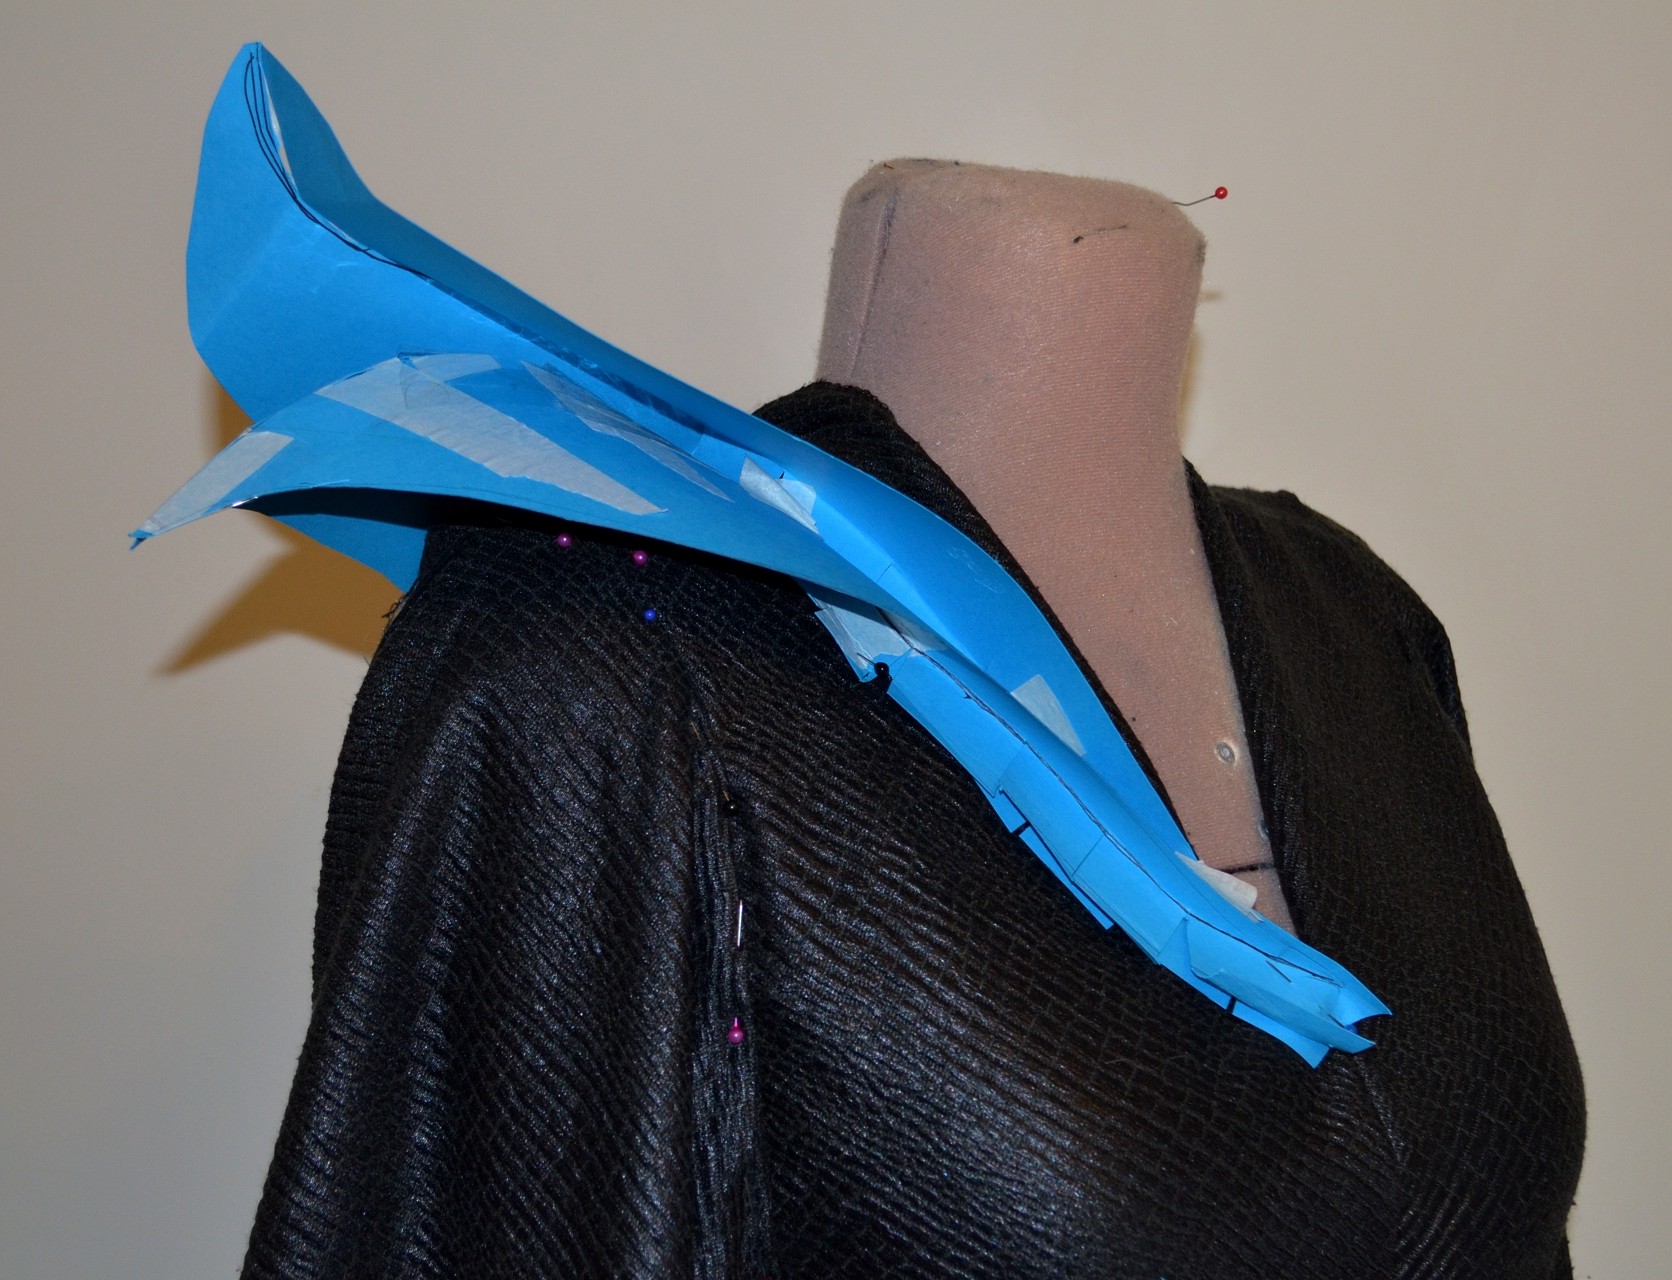
And that means working on my Maleficent horns, which were last left as a digitised form of my full head with sculpt. Well I have gone back to that and I am hoping to in fact get an app to take my headcast to make a proper digital form to sculpt on. Slight issue is that is is so much easier to use symmetry to build up evenly when a human head really isn’t.


So I now have blender back and it’s much easier to use though the UI has changed enough that help is no longer helpful, but it does have a boolean modifier which means I should be able to use this work with a cleaned and tidied 3d model of my head.


So I have downloaded an app to hopefully get a decent model.


There is another that is free but requires credits to export some models, though no real explanation if obj is one of the file types.


So.


Working backwards:


What do I want to do in terms of paint? Well I will want something that will bond to the surface so that means the print needs to be in ABS not PLA.


So ABS also allows me to make the print more stable by careful use of acetone and it allows for a very low density fill with a solid skin.


ABS can also be heated to take on a subtle new curve.


Then I need to find where I need to slice the model- in order to make best use of the layering in an extrusion print. And to fit within the physical limits of printers. The horns are easy, the base is going to be tricky. Did I mention it’s going to be in three parts like the original?


While not needed in this headdress the holes in the base are there for a purpose as are the teeth (like a comb) at the front.


Anyway, I have the Christening Gown still in two pieces (train and gown) so once I finally get myself somewhere where I can test some Kryolan TV Stick I will indeed have a full costume and will then also be able to finish my sickening gown.My skin is fussy beyond words. It basically means I am fairly stuck with one moisturiser, one cleanser, and they do not play nicely with makeup. But I can get TV Stick to work, go figure. So I need to match my skin. Ahahahahahahaha! But I think I do know the tint I just need to try some on my face with my full skin care routine. Which apparently now will include Murala oil as the one and only oil I have ever tried that my skin will absorb. Everything else ever sits on my skin and wanders off. This doesn’t. It’s very exciting.


Yes the two costumes are related, I hope.

glittersweet: (Default)

My Sickening Ball gown has me a little stumped in terms of the hem. There will be four hems approximately 15m wide. I was going to shape the hem but the same problem arrises which is not just matching the hems but sewing them neatly.


I was going to just use horsehair braid but I may need to be a bit more cunning.


I might in fact grab some hem tape and press it to the edge of the fabric, then pin and press that together and then I will have a very firm edge to turn over again and press and then, turn it back, press and use the blind hemming stitch on my sewing machine. A long process but the fabrics are wobbly and do not play nicely without careful preparation.


Once hemmed I’ll be able to line the hems up, baste into sections and then work them all as one layer.


As to Maleficent I will be attemtping to get a 3D model of my headsculpt. The app uses my own phone to process which means being tethered to my PC but hey.

glittersweet: (Default)


My Take A Breather costume- A remake of my Jem dress 🙂 The belt and shoes were still fine but I also have a glorious new wig. So it needs a really glam dress.


And Ahsoka belt and bracers. I now have the belt wet forming on a dressform.


The horns separated in temperature change, the plastic went up and the clay went down. This necessitated getting the horns able to be worked on more easily and able to be tidied away.


Take the seat off a stool and replace it with the sculpting surface. Perfect height for sitting at 🙂


My back lekku is a little short and the front sit too close so I also had to change how I worked with her.


So I put my old head cast on a dress form. Her neck is so short because I was aligning bust and chin. My shoulders sit much lower and my neck is rather long. This may help exlpain how much work I need to do on patterns to fit them! And why dress forms are rarely helpful.


This is a waratah. It is not supposed to be a standard (long skinny trunk and ball shaped top.) But that is what we have. Also the bottle brush at the back is not a single tree but is doing what the waratah was supposed to.


Finally some of the ducks are back. This one taps on my door for food. And then goes to the other end of the drive to the house to ask for more.

glittersweet: (Default)


New horn frame with some clay added back. The aim is that this will be easier. Also when scanning I only need one horn, thank goodness.

glittersweet: (Default)

instagram update


I wound up putting clay on and off about four times. #maleficent horns are easier to sculpt with a 3d reference!


View in Instagram ⇒

glittersweet: (Default)

instagram update


Working with clay today- to save power all at once. #padmeamidala #maleficent #leiaorgana redo 🙂 but now clay under nails so need to scrub them!


View in Instagram ⇒

glittersweet: (Default)

So after finding the short cuts to delete selections and delete inverted selection I did isolate my horns in ReMake and I did then manage to get them into Sculptris and have been smoothing and pinching and generally finding it really pleasant. Intuitive I think.


Just have to remember that there is a limited number of times you can undo!


The brush is also cool, I need to see if I can change the shape not just size but the pinching, crease, and smoothing tool have done so much already!


And yes, I am building this as a symmetric piece so it may need care when I print- but I am inflating the base so that should give enough room to put in a foam layer for comfort.

glittersweet: (Default)

I have been using @Autodesk @AutodeskReMake for a while. Just the free version while I practice how to photograph my models. I think I finally cracked it, and it’s almost certainly going to offer great results once I pay for the subscription and can send 250 photos not just 50 😉


So my very first test.


I can’t find my photos but basically I started with the head cast a little way from my far workroom corner and took photos with it stationary.


Looking at the model put out through different angles:


So here you can see the rest of the room was partially captured but the sculpt is well defined.


Isolating the sculpt and it’s even captured all the clay shavings! Just a few lumps in the horns but otherwise I’m impressed.


However I was not really able to get close enough in all angles around my sculpt to get decent shots of the underside of the horns.


So I watched a few more tutorials and a few suggested rotating the object rather than standing up and lying down to get angles otherwise difficult.


This was in the same place as before. The doorhandle looks mildly terrifying…


Still on the same stand and this time against a wall in better light. Well I have bricks!


So I painted the horns pink! And put them on a tall stand to really isolate them. Again the horns disappear and there is a great view of the wall.


Okay so obviously this sculpt needs to be static not moved around. I realised the back deck is often protected from harsh sunlight but offers good light bouncing from many surfaces. So to the deck with my pink horns on a spike and finally got this:


Lots of background but the horns are easy to isolate.


So finally some of the ridge detail is captured! But still quite lumpy.


Each model used the 50 photo limit. I do think with 250 photos I’ll be able to get all the detail needed.


So for a sculpt like this, of complexity of line:


Do make sure the model is static. Do not rotate it for different angles, move yourself around instead.


Get it at a height where you can get images from underneath as well as on top and all around (for me this is about knee to waist high)


Get some photos with the full area around you as that will help isolate the model and put it in context.


Get some mid distance images.


Once those are done you can get in close. I have to reset where my camera focuses because I got a few where the point was on the deck.


But yes. I’m going to set up a few sculpts outside so I can digitise a good number of them. Shae for one, old Maley horns for another. And I’ll melt some clay and pour into some other molds to capture them as well 🙂 I think with one month Subscription I can get a reasonable number captured. Heck I will even capture my Togruta horns for in case I have to move and my molds have to go bye bye. I may have someone who could take them on but I’m not 100% sure.


glittersweet: (Default)
by michaela de bruce, May 26, 2014


http://invisiblemoose.tumblr.com/post/86719450287/absolutely-stunning-maleficent-cosplay-d


6 COMMENTS


  • You ROCK! As always.


      • ADMIN

        REPLY


      • June 26, 2014


      Thank you 🙂


    • KRISTIN

      REPLY


    • June 4, 2014


    This is hands down the best maleficent costume I’ve seen! Wonderful job. I want one 🙂


      • ADMIN

        REPLY


      • June 11, 2014


      Thank you 🙂 Super fun to wear, a total pain to make but worthwhile 🙂


    • CHANELLE

      REPLY


    • June 25, 2014


    I love this!!!! Is the headpiece available for purchase?


      • ADMIN

        REPLY


      • June 26, 2014


      Thank you 🙂 I still have my molds and am thinking of doing a number of casts while I have the product (finally got a large amount of aerosil/cabosil which makes it lay up easily in a curved mold and not run out everywhere!


glittersweet: (Default)

EARS MOSTLY WORKED 🙂


by admin, January 20, 2015


I just have always had issues, so I may cast the next set as hollow pieces


glittersweet: (Default)

LOVE THESE SO MUCH!


by admin, January 25, 2015


We have very directional low light but here, wig sewn around the horns 🙂 they really do stay on just with the wig combs 🙂


glittersweet: (Default)

MALEFICENT EAR 🙂


by admin, January 22, 2015


Should come in handy for a few projects 🙂


glittersweet: (Default)

MALEFICENT WIG HACKING


by admin, January 24, 2015


So this happened…. I still need to sew the wefts together at the back. But I also have to file down the sides of the horn base- they push my ears out.

Way too hot to wear these but hey. Good practice.

Might glue the horns in place which means… Yep. Gonna have to cast a new set for wearing with the helmet (which has been cut up the middle front but otherwise left intact.)


glittersweet: (Default)

Maleficent collar template!


If anyone needs a base I’ll be sure to scan these as soon as I have a moment. Right now my sinuses are really kicking butt (I suspect bacterial infection because yay, RA and comprmoised immune system and how familiar this all is) and I’m finding it hard to concentrate. But I have kept all my patterns to transfer to 1:10 scale patterns 🙂


Sooo.


glittersweet: (Default)


Maleficent fibreglassing


Sooo, the duo tone blue green doesn’t show up in the photo but it does in reality and I’ll just mix some and coat it tomorrow.


So I put the horns and head in the sink and used hot water to soften them enough to remove from forms.


E voila! Head support, untrimmed horns and staff all ready for the next stage of sticking together and sanding.


See the thin layer on the horns? It’s a bit tricky to do and I’ll probably not do that again. These will get a layer of black latex for the show so I don’t need to try and make some latex sheeting. It’ll stay well until I need to remove it 🙂


So how to stick the horns to the support? No idea just yet! They’ll be trimmed before anything else. And I’ll try and get some foam inside. Still not sure how one of the horns got warped but it must have been during curing as it won’t heat shape out.


glittersweet: (Default)

Maleficent, new parks costume, maybe….?


Well it was made for the Social Media Moms’ event so it may or may not be permanent.


The gown in action sheds a lot of light on the train of the original. It fits to the back after all unlike her other robes.


https://twitter.com/samhowzit/status/454767382804721664/photo/1


https://www.flickr.com/photos/aloha75/13991128094/in/set-72157643806632283


(many more, scroll through to see them all)


https://www.flickr.com/photos/hyku/13787915495/


And even more, scroll backwards for images from the meet and greet.


So from the recreation:


The gown is less full but is made from a knit mounted over a more stable fabric. The sleeves have extra details to reflect the original gown (deep wedges/notches at the hem of the front of the sleeves.


The headdress appears all in one and has more sculptural lines on the leather parts.


The collar sits wider, possibly not hooked to the choker, which is what I suspect may be needed.


The choker has a centre front seam.


The fabric is not purple but the lighting was used to make it so- another nod to the original.


The hem of the gown and the train is not as large as the original. Makes sense having just tried to wrangle the back alone….


There are skirt gores and they are similar to the ones in the Game of Thrones Westeros gowns. But narrower! There is a sculpted detail like a tail that covers the top of the gores and appears to go through in the recreation, it appears flatter in the original so may just be butted.


The back has a spine of some sort. Probably to cover a zipper- a good quality metal zipper as per the burlesque corset reblogged the other day 🙂  I’ll attempt a sculpted urethane piece.


glittersweet: (Default)

Maleficent pleather wrangling


So it’s a total pain to try and sew as it sticks to everything. To tidy the front edges I needed to top stitch a narrow facing. And I stumbled across this nifty little method to avoid puckering!


A button hole foot! Yep, this sticks to the pleather and you can then sew the full length and then lift the foot and slide forward again as you need.


For those of us with some fancy feet but not all.


For the hem I used a really sloppy running stitch with a very few back stitches, then clipped the hem off.


Once the hem was reshaped I then zipped it under the overlocker using the hand basting as a guide. I don’t fancy hand sewing all this. So I may wind up doing a “rolled” hem that the machine does. It’s a silly name as there is no rolling, just a very tidy encasing in thread effect.


glittersweet: (Default)

Maleficent has a huge hoop. Bugger.


I had suspected but a few images put together really do reveal this quite clearly.


If you watch the Awkward Situation clip you can see how the train skims the ground without folding or dragging. If you watch the edge of the train as she goes up the steps it even catches and springs just like a hooped skirt. If you have ever worn hoops or a cage crinoline with flat steels/plastic it wibbles a bit like a jellyfish.


Note how the front edge of the train stops, it doesn’t just pull like fabric under tension it moves like there is a wired edge. And in movement the edge then springs forward once released from that first step.


Here the train is caught on the last step but this is mainly to show the front of the gown is not also stifened. It does have a fairly deep hem which does has some sort of facing but it still flows. It also looks like Angelina is wearing platforms to add to her height- note how the toes push the fabric out above hem line.


You can also see the wired edge also extends in to the seam where the train is sewn to the gown. This makes sense to help support the full train. Having now made mine it is very heavy indeed.


This then explains why that seam appear to be top stitched or otherwise additionally reinforced in other images.


So I had a look at stills again and they do also support the idea of a supported train. In the still below (screengrab) you can see how the train edge is under a lot of tension, but also there is a mystery “bump” near the join between the leather and shell fabric- it does not correspond with the step or any fabric componant of the gown. This is most likely due to a support underneath lifting off the ground- as she is turning this makes sense.


And in this still you can see a ridge that follows the main curve of the leather. And even where the layers are caught to the support hoop in the 2nd to left panel.


So a U shaped hoop on the bottom of the train and two gently flared strips inside the front edge of the train. Imagine a curvy scoop. To make mine I’ll be making a tube of fabric to tack to the underside of my train. And a wrapped facing on the front edge. Then wrap three layers of plumbers coil with sports tape to insert just before putting the entire piece on. I will have to use temporary fastenings to hold the ends in place so as to be able to remove them for convention safety!


I have also just overdyed a huge metal zip (possibly for a sleeping bag) so I will have a super mega firm fastening that will survive the pull and drag of this train. Then I can cover it with a spine.


And now to resize my collars 🙂


glittersweet: (Default)

Why Maleficent? Why that costume?


Costume is art. The costume can tell a tale all on its own.


So take this gown.


Why? The film hasn’t come out and even based on the leaked script (which I haven’t read) I can’t surely be a fan of either the character or the film yet? Well true, maybe not. But costume is part of the art department and what art does in any form is make you think and feel,


Maleficent’s gown is the biggest Eff You I have seen in film for a very long time. It is on the same level of brilliance as Mina’s red gown in Dracula and Michelle Pfeiffer’s catsuit in Batman Returns. It’s on par with the world building the costumes affect in Game of Thrones- where one costume spoilt me months in advance.


When you design you do not just draw pretty things or interesting lines. You have to think about the character, their mind and spirit and how they are reacting to the world they live in. And how that world responds to them


Catwoman’s catsuit was literally Selina tearing down the life she had built, and had others build around her, and reforming it. She took a practical item (at least in this bizarre world) and made it into a symbol. Her costume says yes you objectify me but I will kick your ass for doing so. You treat me like this? I’ll take that and make you regret it.


Mina’s red gown is another iteration of Eiko Ishioka’s obsession with the raw self. Being literally and figuratively ablated, exposed. It’s hard to think of it as part of the same theme as Dracula’s armour from the same movie, or the foam latex muscle suits from The Cell or the lycra and paint/cord/ink piece from Der Ring des Nibelungen. It’s a concealing dress after all.  But the texture, colour and self pattern in the form of organic leaves and striated pleats puts it firmly in place as a reminder that Mina conceals herself in the trappings of the society she lives in. In this gown she is letting herself see who she is and what she feels.


So Maleficent. What makes this gown over all her others so special?


In the world of the movie humans are very much dressed as we expect. At least what we expect from years of what Hollywood has shown us of the past. Which is mostly based on modern textures and materials, foundations and construction.


At the start Maleficent is a child of nature, her clothing is loose and flowing and not made from a drafted, and thus mass produced/industrialised. Even her other gowns seem to flow and drape with little relation to the methods used to create the costumes of humans. She is apart. And clearly so.


The gown she chooses to wear to the christening however is very complicated in structure. It mixes both draping and drafting techniques. It is fitted to the body but does not follow the lines of clothing worn by the members of the court.


Bias cutting alone makes the gown different. Bias cutting is so intrinsically different to even the most complicated multiple panel garment cut on the straight. It shifts and requires exquisite fit and shaping and multiple fittings. It is insanely personal and bespoke.


Maleficent has taken great care to dress herself splendidly for this court. Her fabric even mimics the watery weave of the king’s own robes. But again it is different. The texture is not woven but created by hand, organic and deliberately unable to be copied. A true one of a kind.


Her horns are covered but barely. The threat of nature is present though sheathed.


Her gown is bigger, more sophisticated than any other garment at the court. She outshines everyone. Yet the cut, fabric, and scale clearly single her out. No  one could mistake her as being expected or meant to be there.


Her gown says everything her speech does. It says you tell me I don’t belong, well, that’s true; I am more than you. 


Profile

glittersweet: (Default)
pinkdiamond

June 2024

S M T W T F S
      1
2345678
9101112131415
16171819202122
23242526272829
30      

Syndicate

RSS Atom

Most Popular Tags

Style Credit

Expand Cut Tags

No cut tags
Powered by Dreamwidth Studios